Article takeaways
- The honey do list can be reframed from an overwhelming chore assignment tool into a collaborative household management system where partners share tasks based on skills, interests, and availability rather than relationship roles.
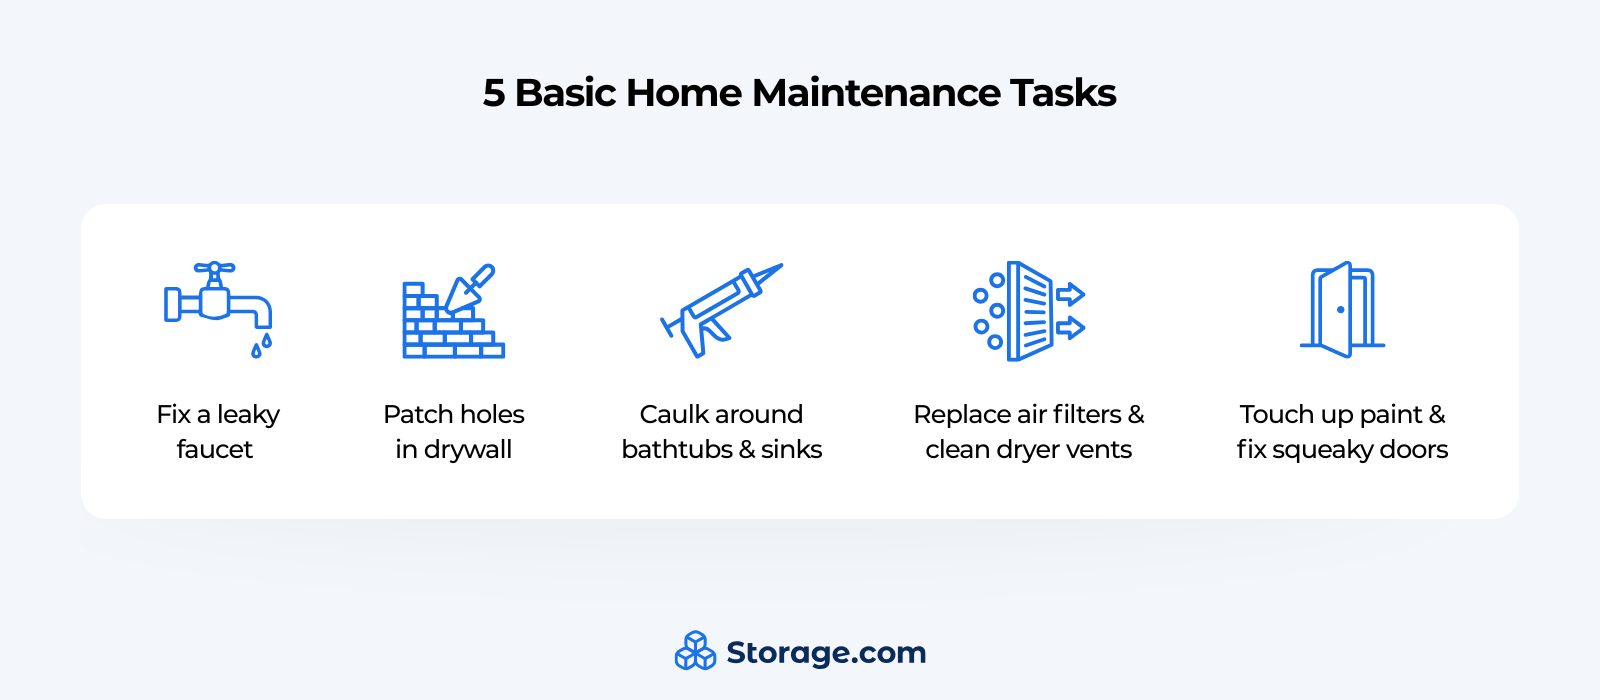
- Five common beginner-friendly home maintenance tasks include fixing leaky faucets, patching drywall holes, re-caulking around bathtubs and sinks, replacing air filters and cleaning dryer vents, and touching up paint while fixing squeaky doors.
- Storage units provide valuable space for tools, materials, and furniture during home projects, and offer climate-controlled environments for paints, solvents, and other hazardous materials, keeping them away from living spaces.
- Employing strategies like prioritizing tasks by urgency and difficulty, scheduling dedicated time for projects, and knowing when to call professionals versus DIY can help you manage your home maintenance list.
- Routine maintenance prevents costly future repairs–addressing small issues like worn caulk or dirty air filters early can prevent water damage, mold growth, fire hazards, and declining home value.
For some of us, acts of service are how we express our love. But in a society shaped by traditional gender roles and a historical division of household labor, our acts of service can quickly organize themselves into an ever-growing honey-do list.
There’s no doubt that the dated practice of tracking, assigning, and completing home projects on a honey-do list can cause communication errors and a jagged mental load to both sides of a partnership. But keeping a to-do list of household tasks that need to be done is a helpful way to keep up with home maintenance, home ownership, and to share the burden of household management.
Our helpful guide aims to reframe the honey-do list as a collaborative household management tool. It doesn’t have to be a list of demands one partner is making on the other. Instead, it can be a list of household chores and handyman tasks that both sides of the partnership divide evenly, based on each person’s skills, talents, interests, or who can get to what first.
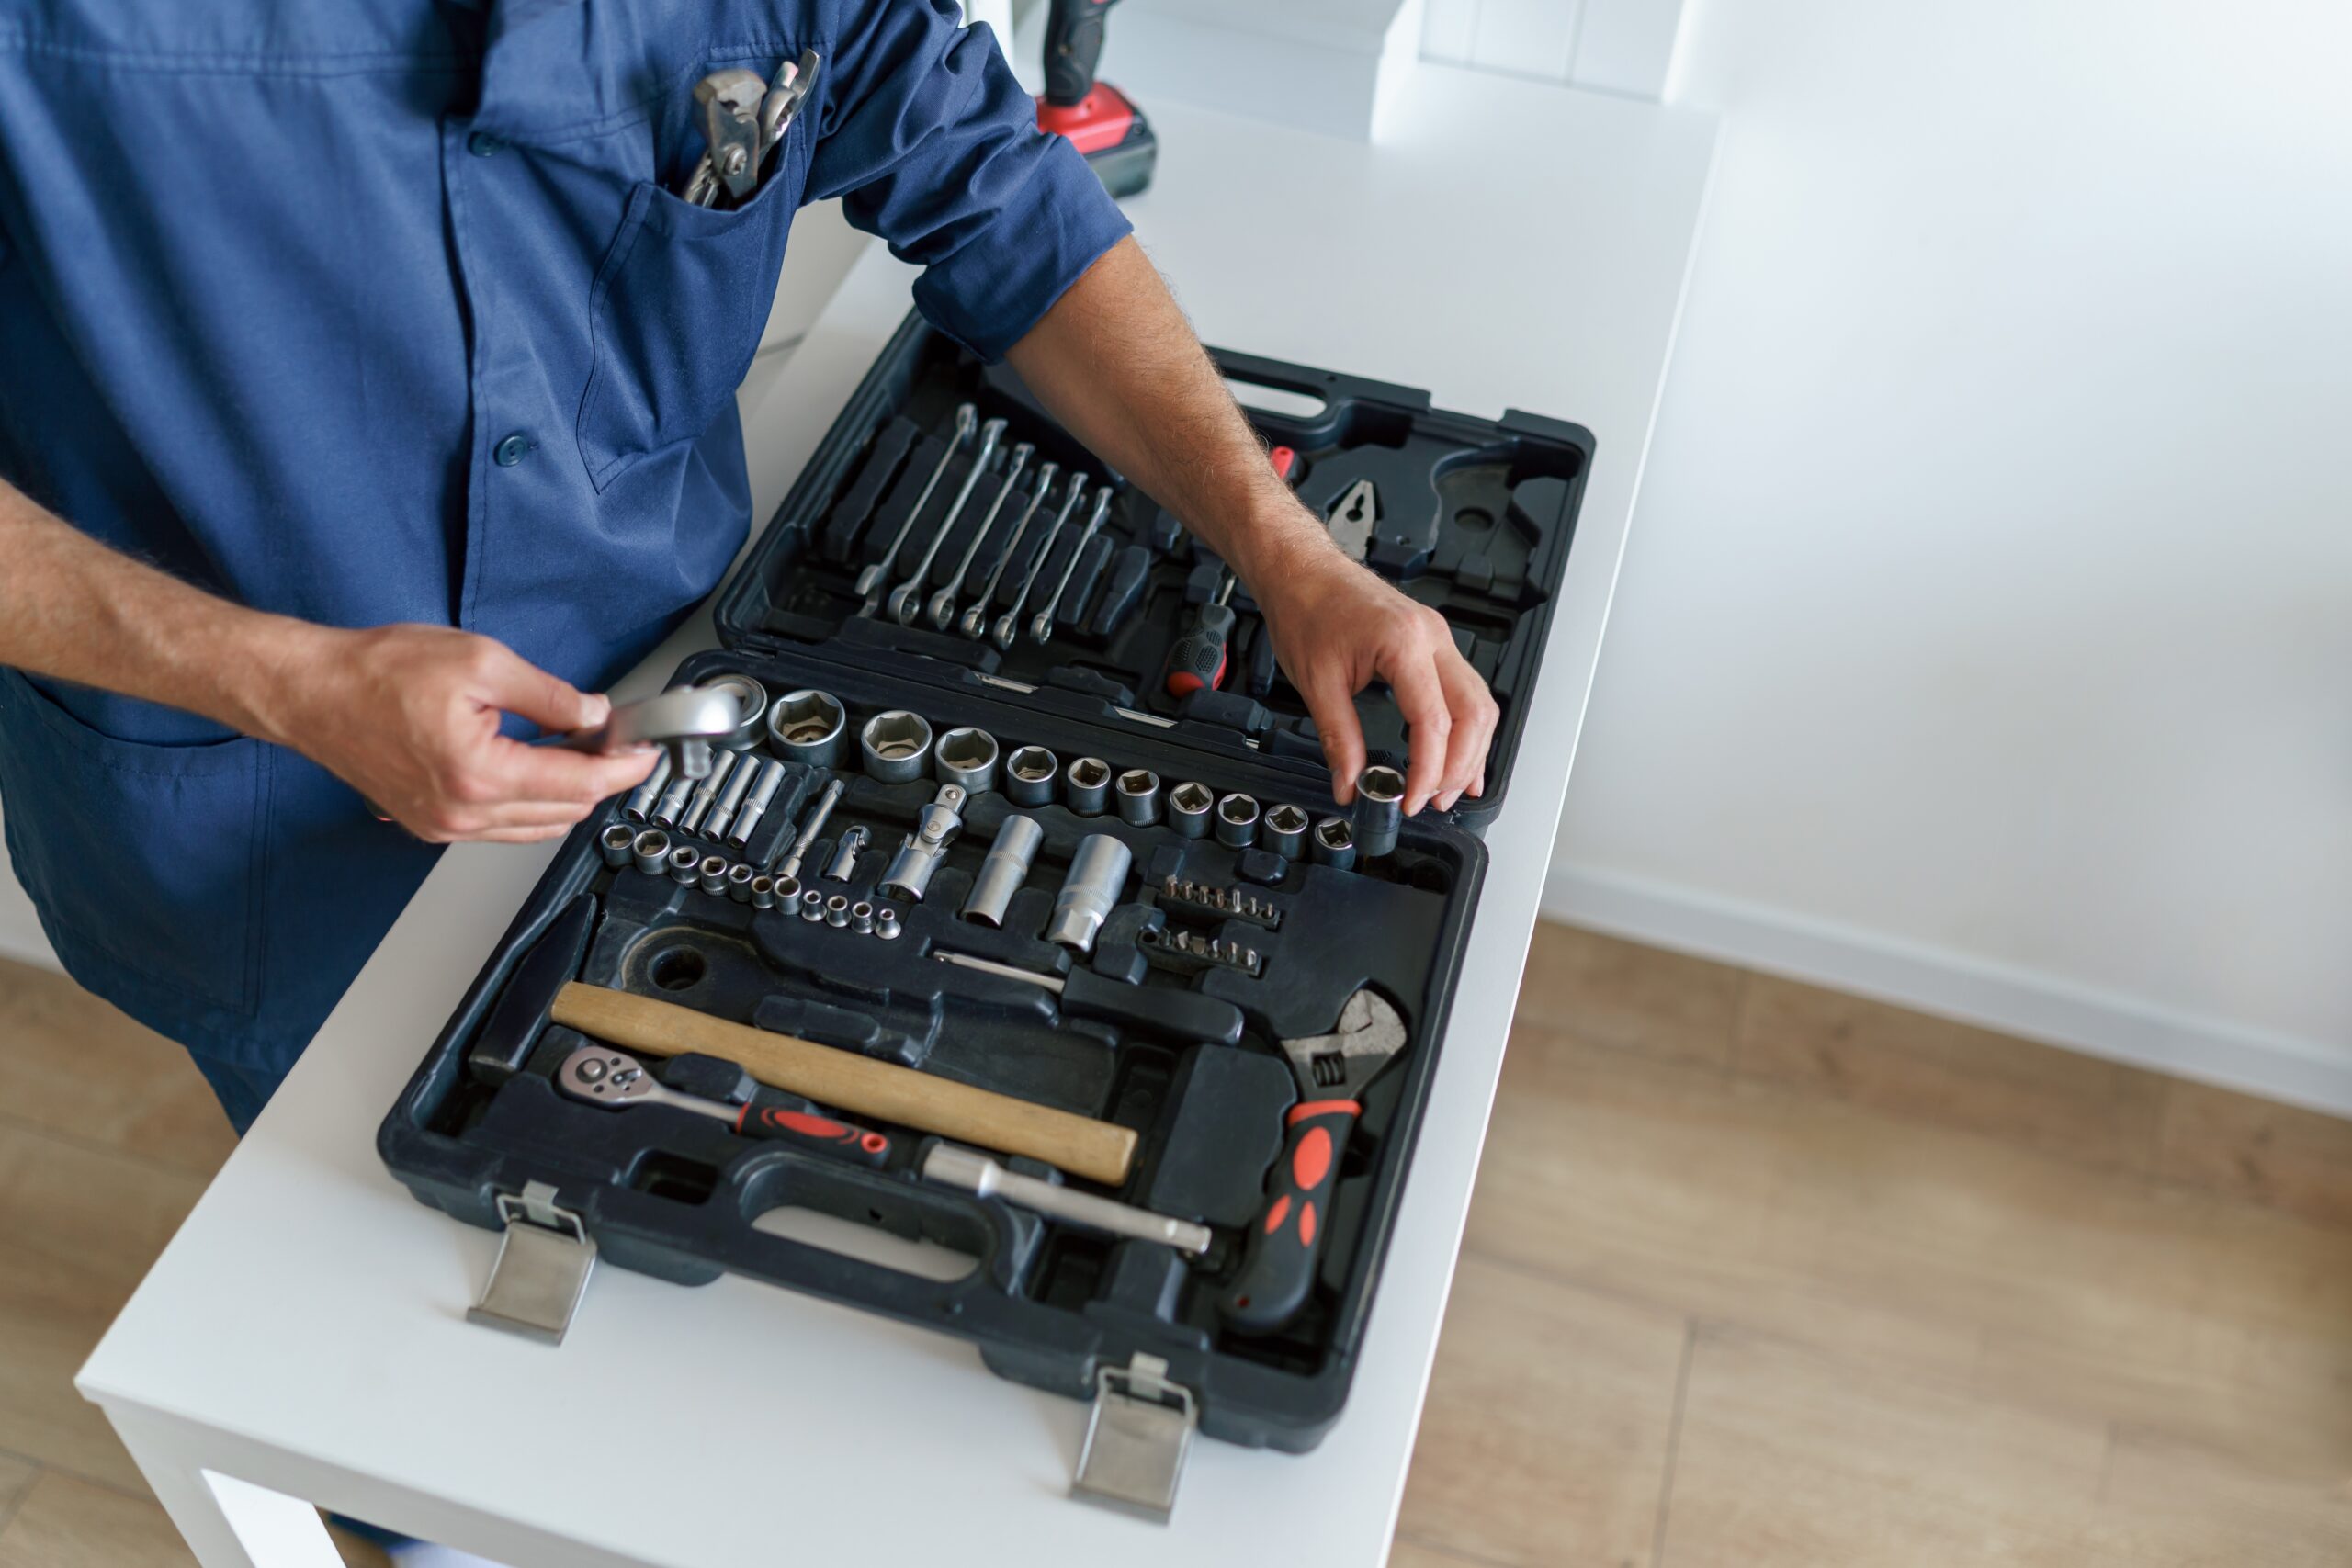
We’ll cover five of the most common household chores to pop up on the list of home maintenance tasks and how to scratch them off. We’ll also revealhow Storage.com can help save you time, space, money, and stress when your home projects require clearing space or storing tools and materials.
Task 1: Fix a Leaky Faucet
A leaky faucet is a classic kitchen repair entry on any honey do list, and for good reason. First of all, the incessant dripping that can disrupt sleep and sanity. But beyond your peaceful rest, a steady leak wastes a significant amount of water, contributing to higher utility bills and environmental strain.
Some household repairs can seem daunting, especially the first time. But in lots of cases, a faucet repair can be a beginner-friendly handyman task you can not only tackle with basic tools, but also boost your morale early in the game.
Stop the Drip: How to Make Leaky Faucet Repairs
Estimated time: 30-60 minutes
Difficulty level: Beginner-friendly
To address this common kitchen conundrum, you’ll need an adjustable wrench, a set of replacement washers or O-rings that fit your specific faucet model, a screwdriver, and some plumber’s tape.
- Start by turning off the main water supply to the faucet to prevent flooding. The faucet’s water supply is usually located under the sink.
- Then, carefully disassemble the faucet handle and stem. You can take a picture of each piece as you take it off to keep track of the order, or you can label each piece with a numbered sticky note.
- Pop out the worn-out washers or O-rings, as these are the usual culprits behind a leaking faucet with a steady drip.
- Replace the old washers and O-rings with fresh new ones, ensuring a proper fit.
- Reassemble the faucet in the reverse order you used to take it apart.
- Turn the water supply back on and test your faucet for leaks.
If you learn better from a visual guide, there are no shortages of videos or visual guides online that can walk you through the process. If the faucet leak persists, or the faucet appears corroded or damaged, or the water supply itself is leaking water under the sink, there’s no shame in contacting a professional plumber.
Task 2: Patch Holes in Drywall
It’s only natural that interior walls acquire their share of nicks, dings, and holes as time goes on. From the big holes caused by accidental doorknob wall-bashing to small picture-frame punctures, drywall repair is a staple on lots of our honey-do list.
For renters, leaving these holes in the wall can cost you your damage deposit. And for homeowners, keeping your walls maintains your home’s value and welcoming, aesthetic appeal. The good news is that most minor drywall damage is well within the scope of DIY household repairs.
Wall Repair Made Easy: Patching Drywall Holes
Estimated time: 1-3 hours (including drying time)
Difficulty level: Beginner to intermediate
For small holes like the ones left by nails or screws, the process is pretty straightforward. You’ll need spackling paste, also called joint compound, a putty knife, paper towels, fine-grit sandpaper, and matching paint. Here’s how to patch small holes in your drywall:
- If your spackling paste came in a toothpaste tube, squirt it into the hole. If it came in a putty tub, use the corner of the putty knife to dig some putty out.
- Use the putty knife to spread the spackle back and forth across the hole until it’s flush with the wall’s surface.
- Use a paper towel to wipe any leftover putty off the knife.
- Allow the spackling paste to dry completely.
- Gently sand the dry spackle smooth.
- Paint over the area so it matches the rest of your wall.
Patching large holes can be a bit more complex. For starters, you may need a whole patch kit or a piece of drywall, and enough spackle to apply it in layers to build up the repair. Be sure to let each layer dry completely, ensuring that the final layer is flush with the wall. Sand the final layer down once it’s dry and paint it to match the wall paint around it.
A well-executed drywall repair can make a wall look as good as new. We suggest keeping a small amount of your wall’s original paint color, paint brushes/rollers, spackling putty, and a putty knife or two in your storage unit or portable storage container. That way, it’s close by when you need to apply some touch-ups, but it doesn’t take up valuable space in your home, basement, attic, or garage.
If the holes in your drywall are so big you’d need more than a small drywall kit, or if you find structural damage to your house’s frame behind the hole, you may need to consult a professional contractor. And if you see any loose wiring inside the hole, contact an electrician immediately.
Task 3: Caulk Around Bathtubs and Sinks
Lasting water damage is the bane of a homeowner’s existence. And preventing water damage with small household maintenance tasks, like checking the condition of your caulk. Caulk acts as a waterproof seal around bathtubs, sinks, showers, and countertops, preventing water from seeping into the walls or under the flooring.
Over time, caulk can crack or peel. And if you fail to replace it, the water intrusion can cause mold and mildew growth that can rip into your flooring, walls, and eventually even your frame. Not only that, but if you or a family member is sensitive to mold, its presence in your bathroom can make you sick.
Long story short, replacing old caulk is a vital household maintenance task that can save significant headaches in the future.
Seal the Deal: Re-caulking Bathrooms and Kitchens
Estimated time: 1-2 hours per area
Difficulty level: Beginner-friendly
To seal your bathroom’s caulking, you’ll need a caulk gun. You’ll need a tube of appropriate caulk–for bathrooms and kitchens, we suggest silicone caulking due to its water resistance and flexibility, or acrylic latex for easier cleanup if you’re painting over it. You’ll also need a utility knife or caulk removal tool and a damp cloth.
- The first step is using your utility knife to meticulously remove all the old caulk from the crevice you’re re-sealing.
- Now start cleaning out any bits of old caulking and let it dry completely.
- Then, load the caulk gun with your fresh tube of caulking.
- Holding the gun at a slight angle and applying steady pressure to apply a smooth, consistent bead of new caulk along the seam.
- Use a damp cloth or a specialized smoothing tool to create a clean finish.
- The caulking manufacturer’s instructions will tell you how long the caulking takes to cure–it’s typically at least 24 hours. Avoid using the sink or bathtub until the seal is completely cured.
If you find any signs of mildew or mold growth inside the sealed area when scraping out the old caulking, you should bring in a professional mold expert to inspect the bathroom. It’s better to catch it early and deal with it while the seal is already open than to seal it in there. Remember, mold likes dark, damp places.
We recommend keeping your caulking gun and a spare, unopened caulk tube in your storage unit to touch up bathroom seals as needed.
Task 4: Replace Air Filters and Clean Dryer Vents
Conducting routine HVAC system upkeep is one of the most important household maintenance items.
Keeping up with your heating, ventilation, and air conditioning systems does more than keep you and your family comfortable; it also contributes to energy efficiency and, most importantly, safety. Neglecting HVAC maintenance can lead to air quality and fire hazards.
Replacing air filters, cleaning dryer vents, and having your HVAC system inspected are all seasonal tasks on your yearly checklist. The average energy cost to maintain a home is already more expensive than ever. It’s best to catch any HVAC issues while they’re still small and manageable.
Breathe Easy: Essential HVAC and Appliance Maintenance
Estimated time: 30 minutes for filters, 1 hour for dryer vents
Difficulty level: Beginner-friendly
Air Filter Replacement:
Your HVAC system’s air filter is the first line of defense against dust, pollen, and other airborne irritants. Replacing it every 1-3 months, depending on usage and filter type (MERV rating), improves indoor air quality and allows your system to run more efficiently.
- Locate your HVAC filter and check the size and filter type, which should be published on the filter.
- Purchase a replacement filter that matches the size and type of your current filter.
- Swap out the old filter for the new one.
- Toss the old filter in the trash.
- Consider switching to reusable HVAC filters to cut back on waste and save some money. With a reusable filter, you simply clean the filter out with a brush once every few months.
- If reusable filters aren’t an option for your filter type, you can always buy your filters in bulk and get a lower price per unit. Simply store the extra filters in your storage unit and swap out the old or a new one every 1-3 months.
Dryer Vent Cleaning:
Keeping your dryer vents lint-free keeps your dryer functioning properly and your house safeguarded against fires. You’ll need some tools handy, like a vent brush and a vacuum cleaner, to help you remove accumulated lint.
- First, you’ll need to brush or vacuum the lint out of the inner access point.
- Then, you’ll need to conduct exterior maintenance on the outside of the dryer’s vent hood.
If your clothes are taking longer to dry or if the dryer is feeling hotter than usual, your dryer vent may need some attention.
Task 5: Touch Up Paint and Fix Squeaky Doors
When it comes to maintaining a strong and vibrant home presentation, small details make a big difference. That’s why home projects like touching up scuffs on interior walls and silencing a squeaky door often make it onto our honey-do list. can elevate the overall ambiance of your living space.
Scratching these easy tasks off your to-do list not only offers you some quick wins in terms of satisfaction. They also provide immediate, trackable home improvements.
Finishing Touches: Paint Touch-Ups and Door Repairs
Estimated time: 15-30 minutes per fix
Difficulty level: Beginner-friendly
Paint Touch-Ups:
If you have some leftover paint from when the walls were painted–or from when you patched your drywall further up on your honey-do list–you’re in luck. If you don’t have the original paint, hit a local hardware store and inquire about a paint-matching service to be sure your wall colors match.
If you do find a perfect match, we suggest you buy an extra gallon or two. Keep the extra paint in your storage unit for future touch-ups.
You’ll also need a paint brush, fine-grit sandpaper, a magic eraser, and a damp cloth.
First, buff any minor scuff marks out with your magic eraser or wet cloth. You want to do this before you paint, so you can paint over any weak spots the magic eraser put into the paint and any marks that don’t buff out.
- Use the fine-grit sandpaper to even out any lumps in the wall texture before you start painting.
- Next, use a small brush to apply a thin layer of paint only to the area that needs to be touched up.
- Let the paint dry.
- Add an additional coat as needed.
Fixing Squeaky Doors:
Squeaky door repairs start with finding the hinge that’s making the noise by replicating the sound multiple times. Once you isolate the culprit, fixing the squeak is usually as simple as lubrication.
- Apply a quick spray of WD-40 or a lithium-based lubricant directly to the hinge pins.
- If the squeak doesn’t go away, inspect the hinge for loose hinge screws and tighten them.
- If neither one of the above solutions fixes the squeaky hinge, then the hinges themselves might be worn and need to be replaced.
How Storage.com Can Help With Your Home Projects
Whether it’s a quick honey-do list item or a larger home project, embarking on any home maintenance or renovation project requires space. Before diving into interior tasks or exterior maintenance, declutter the area of your home you aim to fix.
You want to get everything you can out of the way so nothing gets damaged, and so you have some room to work. This is where storage solutions come into play.
We’ve already mentioned how storage units can save you money and trips to the hardware store by providing you with a secure and accessible place to store tools and materials in between projects.
Well, once you empty the unit of your materials, power tools, and toolbox as you prep for the task at hand, you’ve got some extra space.
You can now use that extra storage space to declutter the room you plan on touching up and store the furniture and anything else that needs to be moved out of the way.
If you’re undertaking a project that involves purchasing materials in bulk or storing paints and solvents, a storage unit offers a climate controlled storage environment away from your living space that’s ideal for storing paints, solvents, insulation, and other hazardous products you might not want at home.
Storage units often offer short-term, month-to-month storage leases. So if you’re renovating a bedroom or doing a major drywall repair and need more storage space for furniture, or if you have a big bathroom remodel project coming up, and you need to store extra materials, you can rent an extra storage unit at the same facility until the project is done.
Storage units can also be ideal for keeping seasonal tools, like gardening equipment for garden tending, or specialized tools you don’t need all the time, such as a reciprocating saw.
Storage facilities often equip robust security features like surveillance cameras, alarms, coded gated entry, and onsite security personnel.
Some storage facilities even offer free delivery/moving truck rentals, so you don’t have to use your personal vehicle to load all your furniture into the unit.
Some commercial storage units rated for business storage even have in-unit electrical outlets. You can make these storage units into a dedicated workshop space where you can cut and fabricate wood and other materials to prep for the project, so you’re not spraying your house full of sawdust particles.
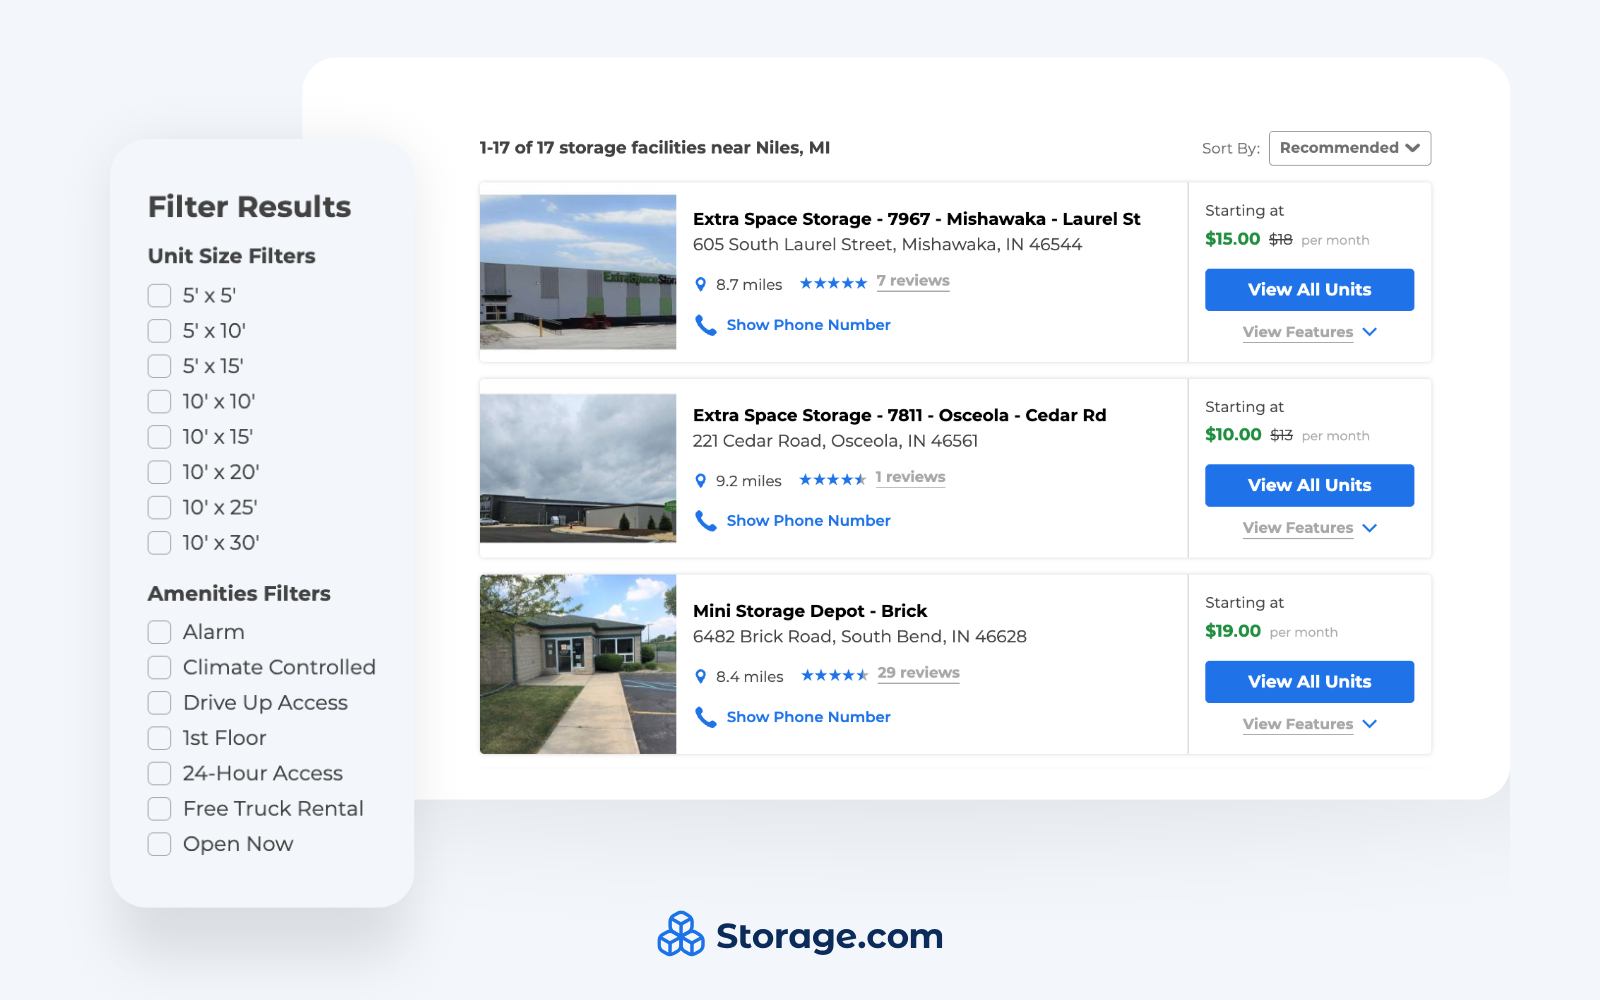
How do you find the ideal storage unit that’s also conveniently located near your house? Plug your zip code into our handy Storage.com search tool, and we’ll do it for you!
Tips for Tackling Your Honey Do List Effectively
Now you understand how to cross five of the most common homeowners’ to-do list activities off your list and how to take advantage of storage to make it easier. Here are some other tips you can use as you start tackling your honey-do list.
First, prioritize tasks. You can do a home assessment as a couple or family to identify what needs immediate attention due to potential damage or safety concerns. Things like standing water or a faulty fuse box will obviously take priority over oiling the hinges on the cupboard door.
That said, you may want to cross off the easy items in the meantime if you’re waiting on a pro to handle the bigger stuff. That’s where categorizing tasks by difficulty and time can help streamline the process.
Consider creating a monthly maintenance plan to spread out household tasks and seasonal tasks throughout the year, rather than letting them pile up. Use a list maker tool, whether a physical notebook, a magnetic dry-erase board in a family command center, or a digital app, to keep track of your growing honey-do list.
For couples, discuss the mental load and agree on an even distribution of household labor. This might involve adopting a fair play method where tasks are discussed and assigned based on skill, preference, or availability, rather than outdated gender stereotypes.
Don’t hesitate to utilize online resources for tutorials and guides. And remember, there’s no shame in calling in a professional when you feel in over your head. In fact, if you’re renting, there are some home projects you won’t want to touch without running them by the property manager or landlord’s handyman first.
Here are a few more last-minute honey-do-list tips.
Smart Strategies for Getting Tasks Done
- Prioritize by urgency and difficulty
- Schedule dedicated time for handyman tasks
- Gather all tools and materials before starting
- Don’t be afraid to learn through online tutorials
- Know when to DIY vs. hire a professional
- Celebrate completed tasks to stay motivated
- Keep a running list and update it regularly
- Consider seasonal timing for certain tasks
Use Storage.com To Get Started On Your Honey Do List Today!
The traditional Honey-Do list can sometimes feel overwhelming, especially if we let it define our gendered homeownership roles. But if we approach it with a strategic mindset that views the list as a list of collaborative projects, it can transform from a chore to a rewarding bonding process.
The concept of the Honey-Do list has evolved significantly, moving from a dated model of assigned chores based on traditional gender norms to a more modern understanding of shared household responsibility.
Whether it’s a leaky faucet repair, addressing drywall repair on interior walls, installing ceiling fans, or mowing the yard, most household tasks are easier to tackle as a partnership. Why create a dynamic where one person gets to write out a chore list for the other to work through, like a heaven-sent handyman?
Start easy and build some confidence–not just in your own ability to conduct handyman tasks, but in your relationship and your ability to communicate as a team.
And remember, you’re not alone. In addition to professionals and online guides, Storage.com is here to help you find the extra space you need to get your tasks done. But with all the storage unit features and sizes available, how do you find the unit you need? And how do you find one near you?
Let’s review a few storage unit basics.
- When it comes to storage unit prices, the larger the unit size, the lower the price per square foot.
- That said, the overall monthly price still increases.
- So if you get an item that’s bigger than you need, you’re paying for space you’re not using.
You can use our storage unit size guide to find out the appropriate size for your needs. Our guide shows you a bird’s-eye view of the layout and breaks down common uses for each size.
Some items need climate controlled storage, including furniture, power tools, paints, and sensitive construction materials. And last but not least, you want to find a unit at a facility in a convenient location.
You might look for one that’s close to your house for quick trips. Or maybe you want one that’s halfway between your job and your house so you can stop by on the way home from work.
Enter your ZIP code into our signature Storage.com locator tool, then use the map to find the storage facility closest to your desired location.